Speedtouch 546 Modem Driver
SpeedTouch Home A modem which provides bridged and PPTP connections for Internet connectivity. The modem uses an Ethernet cable to connect to a PC, Speedtouch 546.
Speedtouch modem speedtouch 330 driver modem speedtouch thomson. Motorola w375 user guide Dodge nitro owners manual pdf speedtouch 546 v6 driver.
Preview of first few manual pages at low quality. Check before download. Click to enlarge.
No opinions have been provided. Be the first and add a new opinion/review.
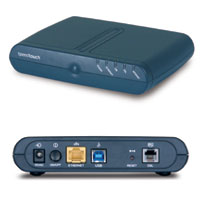
LEDs Reset button Power requirement
LED indicators for all interfaces One recessed reset button for restoring the default settings Power supply: 15V AC, 1000mA
If POTS in overlay: G. handshake, Full Rate ADSL, G.dmt, G.lite splitterless ADSL, ADSL2, RE-ADSL and ADSL2 If ISDN in overlay: G.handshake, G.dmt, ADSL2, RE-ADSL and ADSL2
Up to 16 simultaneous PVCs, allowing multiple simultaneous destinations ATM QoS per PVC: CBR, VBR-rt, VBR-nrt, UBR RFC 1483 / 2684 multiprotocol encapsulation over AAL5 / ATM: both LLC / SNAP and VC-based multiplexing supported
Multiport self-learning transparent bridge per IEEE 802.1D for LAN interconnect Remote bridge ports are isolated from each other Pre-defined bridge filters to WAN no filter, no CPE-to-WAN broadcast, PPPoE only and to LAN no filter, multicast filter
Multi-port up to 16 PVCs router Static routing, automatic routes PPP, LAN IP address multi-homing
UPnP with NAT traversal capability: enables game technologies Xbox live, Direct X, and many others enables conferencing functions of Microsoft Messenger Transparent bridging IEEE802.1D PPPoE routing/bridging with integrated PPP Relay PPPoA routing, PPPoA-to-PPTP relaying IP routing with static routing, packet classified routing and residential RIP Hyper-NAT with virtual server mapping for instance for Web, FTP, Mail servers and ALGs such as NetMeeting, MSN Messenger, VPN passthrough, and others Quality of Service: IP QoS Integrated Dynamic DNS client
PAP RFC1334, CHAP RFC1994 for PPP session Integrated Stateful Inspection Firewall, Intrusion Detection Parental Control, URL Filtering Multi-level SpeedTouch access policies, Digest Authentication
Home Install Wizard, Easy Setup wizard Intuitive web-based GUI HTTP/HTTPs Advanced configuration via telnet - Command Line Interface CLI Remote management access control
Multi-level user protection, Event logging DHCP server, client and relay, DHCP-to-PPP spoofing DNS server, client and relay Time synchronization: SNTPv1, SNTPv2, SNTPv3 and SNTPv4 System logging SNMPv1 agent with MIB-II Firmware upgradeable via upgrade wizard on Setup CD
The SpeedTouch is equipped with a number of LEDs on its front panel, indicating the state of the device during normal operation.
Following table shows the meaning of the different LEDs:
On On On Power on, normal operation Power on, self-test failed, indicating device malfunction Bootloader active Power off Flashing On Ethernet activity Ethernet connection, no activity No Ethernet connection Flashing On Pending DSL line synchronisation DSL line synchronised No DSL line Flashing On Internet activity Internet connectivity, no activity Internet connection setup failed No Internet connection
1.3 How to Access your SpeedTouch
Your SpeedTouch is accessible in one of following ways:
Configure your SpeedTouch via HTTP or HTTPS. For more information, see 1.3.1 Access via the Web Interface on page 10.
Fine tune your SpeedTouch configuration. For more information, see 1.3.2 Access via CLI on page 11. Backup and restore data on your SpeedTouch. For more information, see 1.3.3 Access via FTP on page 13. Allow a remote user to help you configuring your SpeedTouch. For more information, see 1.3.4 Remote Assistance on page 16.
1.3.1 Access via the Web Interface
To access the SpeedTouch via the web interface:
Open a web browser. In the address bar type your SpeedTouchs IP address or DNS host name, by default that is or 192.168.1.254. You can access the pages via the http protocol. For remote assistance the secure version, https, in combination with certificates is used; provide your ISP with the https link, user name and password before he can log on to the pages. For more information, see 1.3.4 Remote Assistance on page 16.
As a result the SpeedTouch Home page appears, from where you can navigate to all the configurable aspects of the SpeedTouch.
All the CLI commands can be executed from within an FTP session. Only complete CLI commands in other words, the complete command syntax with all the parameters already specified can be executed. Example: To execute the CLI command :software cleanup: At the FTP prompt type quote site software cleanup and press Enter.
ftp quote site software cleanup 200200 CLI command software cleanup executed ftp
For more information on CLI commands, see the CLI Reference Guide.
You can make your SpeedTouch accessible from the Internet with regard to remote support. This way, you can allow your helpdesk to access your SpeedTouch remotely. To enable remote assistance:
Go to the SpeedTouch pages, as described in 1.3.1 Access via the Web Interface on page 10. In the menu select Toolbox Remote Assistance. Click Enable Remote Assistance. Provide the following parameters to your helpdesk: URL the HTTPS link User name Password
Your ISP is now able to access your SpeedTouch via the secure HTTPs link in combination with the provided certificate a secure authentication mechanism. For security reasons, after 20 minutes of inactivity, or on reboot, Remote Assistance will be automatically disabled.
Go to the SpeedTouch pages, as described in 1.3.1 Access via the Web Interface on page 10. In the menu select Toolbox Remote Assistance. Click Disable Remote Assistance.
The Ethernet ports on the back panel of your SpeedTouch allow you to connect the SpeedTouch to an existing 10 or 100 Base-T Ethernet network or to a computer with installed Ethernet card. Using the SpeedTouch Ethernet switch, you can create a local Ethernet network of up to four devices, without needing extra networking devices In the SpeedTouch package, a yellow full-wired straight-through RJ-45/RJ45 Ethernet cable is included.
Use the yellow Ethernet cable provided to wire your computers Ethernet port to the one of the SpeedTouchs Ethernet ports. The Ethernet cable can also be used to wire any Ethernet port of your SpeedTouch to an external hub or switch. Please follow the installation instructions supplied with the external hub or switch for connections and Ethernet cabling.
Once youve connected a device, you are able to personalise its settings:
Go to the SpeedTouch web pages. In the menu select Home Network Devices. Click the name of your device, or if the devices settings havent been personalised yet, click the MAC address of the device. On the top right, click Configure. Now you can change the devices name, lock its IP address and assign applications and services to the device.
On the Apple menu, click System Preferences. In the System Preferences window, click the Network icon. The Network window appears. Make sure Built-in Ethernet is selected in the Show list and click the PPPoE tab:
Enter the Account Name and Password provided by your Service Provider. Select Save password in case you want the computer to remember the password for this account name. Optionally you can enter a name for this connection in the Service Provider field. All other fields may stay empty.
Click the Internet Connect dockling. If the Internet Connect dockling is not available, go to the Applications folder on the system startup disk and double-click Internet Connect.
Make sure Built-in Ethernet is selected in the Configuration list.
If needed, enter user name and password for your user account at the Service Provider. Click Connect. As soon as the connection is established you can open your web browser and surf the Internet.
Make sure Built-in Ethernet is selected in the Configuration list
The SpeedTouch comes with embedded HTML pages, providing an interface to the software installed on the device. It allows easy setup and management of the SpeedTouch via your web browser form any PC connected to the SpeedTouch. See 1.3.1 Access via the Web Interface on page 10 to access the pages.
Consult: The SpeedTouch Installation and Setup Guide for more information on setup and installation procedures.
The SpeedTouch web interface consists of following components: Menu Language Bar Navigation Bar Notification Area Tasks
Navigation bar Notification area Language bar
The menu is located on the left side of the page and consists of the following menu items: SpeedTouch: Provides basic information on the SpeedTouch. Broadband Connection: Allows you to view/configure your broadband connections. Toolbox: Allows you to assign games or applications to a device and secure your Internet connection. Home Network: Allows you to manage your local network.
Collapsing and expanding the menu
You are able to collapse/expand the menu by clicking the arrow located on the top of the menu.
The language bar is located under the SpeedTouch logo and allows you to change the language of the SpeedTouch web interface.
The language bar will only be shown if more than one language is available.
The navigation bar is located on the top of the page and allows you to: View the current user name. Click this name to change your password or switch to another user. View the current position on the SpeedTouch web interface. Get context related Help information.
Depending on the page you are viewing following buttons will be available: Overview to view a summary of the current status or configuration. Details to view more detailed information on the current status or configuration. Configure to change the current settings.
The notification area is located under the Navigation Bar and is used to display: Error messages indicated by a red traffic light. Warnings indicated by an orange traffic light. Information indicated by a green traffic light. If none of these events occur, the notification area will not be shown.
To allow a swift configuration of your SpeedTouch, some pages may offer you a number of related tasks. These tasks will guide you to the page where you can perform the selected task.
The SpeedTouch home page gives you a short overview of all the configurable aspects of the SpeedTouch: SpeedTouch Broadband Connection Toolbox Home Network
The SpeedTouch menu consists of following items: Information Configuration Event Logs Update
The SpeedTouch page gives you some basic information on the SpeedTouch: Product Information Configuration
The Information page summarizes important information on your SpeedTouch. You may need this information when you contact your helpdesk.
This wizard helps you configure your SpeedTouch Internet connection. To configure the SpeedTouch using the SpeedTouch Easy Setup wizard:
On the left menu, click SpeedTouch. In the Pick a task. list, click Set up. The Easy Setup wizard will now guide you through the configuration of your SpeedTouch.
On the left menu, click SpeedTouch. In the Pick a task. list, click Restart.
Click Yes, restart my SpeedTouch. The SpeedTouch restarts. The SpeedTouch returns to the Home page.
The Overview page displays the current configuration of your SpeedTouch. The Details page displays more detailed information on the current configuration of your SpeedTouch. The Configure page allows you to change the current configuration.
If you want to: Reconfigure your SpeedTouch: Click Configuration Wizard under Service Configuration. For more information, see 4.3.2 SpeedTouch Easy Setup on page 41. Configure the time settings of your SpeedTouch: Select Auto-configuration if you want the SpeedTouch to use a time server to synchronise its clock to a dedicated time server. Clear Auto-configuration to manually configure the SpeedTouch time settings. Disable/enable web browsing interception or set it to automatic. If you disable web browsing interception or set it to automatic you will not be able to use Parental Control.
Click Apply to save your settings.
This page allows you to: Save your current configuration. Restore a previously saved configuration.
Accessing the Backup Restore page
On the SpeedTouch menu, click Configuration. Click Configure. In the Pick a task. list, click Save or Restore Configuration.
Saving your current configuration
Click Backup Configuration Now. Click Save. Choose a location to save your backup file and click Save.
Restoring a previously saved configuration
Click Browse. Select the configuration file you want to restore and click Open. Click Restore Configuration Now. The SpeedTouch loads your configuration and restarts. At the end of the procedure, the SpeedTouch returns to the Home page.
4.3.6 Reset to Factory Defaults
This page allows you to reset the SpeedTouch to return to the initial configuration of your SpeedTouch. All your changes will be deleted.
Accessing the Reset to Factory Defaults page
On the left menu, click SpeedTouch. In the Pick a task. list, click Return to Factory Default Settings.
Resetting the SpeedTouch to factory defaults
If you want to reset your SpeedTouch to factory defaults, click Yes, reset my SpeedTouch.
If you reset your SpeedTouch to factory default settings, all active connections will be disconnected.
The Event Logs page summarizes the latest events recorded on your SpeedTouch.
The Recorded Events table gives you an overview of the latest event logs that have been recorded since power on. The first column of the table indicates the importance of the event log
The Category list allows you to filter the events shown in the Recorded Events table. For example, by clicking Security you can view all security related events, for example generated by the SpeedTouch firewall.
Updating the SpeedTouch system software
The Update page allows you to: View System Information. View information on the current System Firmware. Update your SpeedTouch from a remote server. Use this option if you want to have yourSpeedTouch check on the internet for new firmware and update if it found one. Update from a PC. Use this option if you want to install on your SpeedTouch that is located on the PC.
The Broadband Connection menu consists of following menu items: DSL Connection Internet Services
The Broadband Connection page gives you a short status overview of the connections configured on the SpeedTouch.
Click View more to see more information on the selected broadband connection. If you configured a dial-up connection, you are able to establish/terminate the connection by clicking Connect/Disconnect.
This page enables you to perform a connectivity check on an Internet service of your SpeedTouch.
Accessing the Connectivity Check page
On the left menu, click Broadband Connection. In the Pick a task. list, click Check connectivity to the Internet.
Checking you Internet Connectivity
In the Internet Service to Check list, click the Internet service that you want to check. Click Check Connectivity. The SpeedTouch lists the test results in the Test Results list.
If the test is successful, you will get a list of green check marks. Otherwise a red cross will indicate which tests have failed.
Click Overview to view brief information on your DSL connection. Click Details to view a more detailed information on your DSL connection.
The Internet Services page displays information on your Internet Connection s.
If you configured a dial-up connection you are able to establish/terminate the connection by clicking Connect/Disconnect. To view more detailed information on a specific connection, click the View more. link of the corresponding connection.
4.4.4 Internet Service Settings
Accessing the Internet Service Settings page
On the Broadband Connection menu click Internet Services. Click the View more link of the internet service you want to view.
The Overview page gives you basic information on the selected Internet Service. If you configured a connection you are able to establish/terminate the connection by clicking Connect/Disconnect.
The Details page gives you more detailed information on the selected Internet Service.
If you configured a dial-up connection you are able to establish/terminate the connection by clicking Connect/Disconnect.
The Toolbox menu consists of following menu items: Remote Assistance: Allows you to make your SpeedTouch accessible for remote support. Game Application Sharing: Allows you to share services and games that you run in your private network towards the internet. Parental Control: Allows you to block/allow access to specific web sites. Firewall: Allows you to configure the security level of the SpeedTouch firewall. Intrusion Detection: Allows you to view the intrusions you are protected against. Dynamic DNS: Allows you to assign a DNS host name to your broadband connection s. User Management: Allows you to manage the users configured on your SpeedTouch.
The Toolbox page gives you an overview of the available services and their current status. You can click on the names of these services to go to the corresponding web page.
This page allows you to make your SpeedTouch accessible for remote support.
4.5.7 Web Filtering Activation
On the Toolbox menu, click Web Site Filtering. In the Pick a task. list, click Activate Web filtering License.
This page allows you to: Activate a Web Filtering evaluation license. Activate a free 30-days Web Filtering evaluation license.
Click Standard. In the License Key box, type the license key provided by your ISP. Click Apply.
On the Toolbox menu, click Web Site Filtering. Click Configure. Click the Edit link of the content level you want to edit.
This page gives you an overview of the different categories and their rules. Following icons indicate whether the content type is allowed or not:
The category/group is allowed The category/group is not allowed. The group is partly allowed.
This page allows you to change: The content level name. The content level description. The content level configuration.
This page allows you to create a new content level. To access this page:
On the Toolbox menu, click Web Site Filtering. In the upper right corner, click Configure. Under Pick a task., click Create a new content level.
To apply a new content level following actions must be performed:
Content level creation Content level configuration Content level definition Content level activation
You can create up to 16 content levels.
In the Name box, type a name for the new content level. In the Description box, type a short text to describe what this security level will do. Click Next.
The Configuration section becomes available. Click: Clone Existing Level to start from a previously created content level. If no levels have been defined before, this option will not be shown. Black List to allow all web sites by default. White List to block all web sites by default.
Only web sites that match the selected content level will be allowed. Proceed as follows:
If you want to: Allow a category: Select the check box next to the category name. Allow an entire group: Select the check box next to the group name. Block a category: Clear the check box next to the category name. Block an entire group: Clear the check box next to the group name.
To activate your new content level:
On the Toolbox menu, click Web Site Filtering. In the upper right corner, click Configure. In the Content Level list, select your new content level. The new content level is now active.
The Overview page summarizes the overall security policy configured on your SpeedTouch. The Configure page allows you to select the security level of the SpeedTouch.
Select one of following security levels: Block All: to protect your network from all attempts of incoming from untrusted site connection requests and to perform checks on outgoing from trusted site connections. This level is meant to prevent incoming malicious traffic. Standard: to protect your network from all incoming from untrusted site connection requests while permitting safe outgoing connections. This is the default. Disabled: to allow all incoming and outgoing traffic. This does not mean the complete SpeedTouch firewall is disabled. It means all traffic coming in on one interface and going out on another is allowed, but access to the embedded services of the SpeedTouch as telnet, web interface. is only allowed for clients residing on the LAN side, so the SpeedTouch itself stays protected. High: Use this Security Level to block all outgoing connections except well known applications DNS, HTTP, HTTPS, FTP, TELNET, IMAP, POP and block all incoming connections. Game Application sharing is not allowed by the firewall.
Your SpeedTouch is protecting your network against malicious intrusions. This page shows you the intrusions you are protected against. The Protected Intrusions table shows the number of times the SpeedTouch actively protected your network against each intrusion since last statistics reset.
The Dynamic DNS service allows you to assign a dynamic DNS host name e.g. john.dyndns.org to a broadband connection even if it is using a dynamic IP address. As soon as the device gets a new IP address, the dynamic DNS server updates its entry to the new IP address. Click Overview to view the different Dynamic DNS clients with their name, hostnames, interface and IP address. The Configure page allows you to assign a Dynamic DNS host name to a broadband connection:
Create an account at the Dynamic DNS service of your choice, for example: www.dyndns.org www.no-ip.com www.dtdns.com GnuDIP for Linux
On the Dynamic DNS page, click Configure. Select Enabled.
If needed, click the broadband connection to which you want to assign the Dynamic DNS hostname in the Interface list. Type the user name and password of your Dynamic DNS service account in the corresponding fields. In the Service list, click your Dynamic DNS service. In the Host box, type the host name you want to assign to this interface for example myspeedtouch.dyndns.org. Click Apply.
The Overview page gives you an overview of the currently configured users and their privileges. Clicking the name of a user allows you to edit his user account.
The Configure page allows you to: Click Add to create a new user account. Click Delete to remove a user. Click Edit to change a user account.
On the Toolbox menu, click User Management. Under Local User Data, click on the name of the user you want to edit.
The Edit User page allows you to: Click Reset Password to reset the password of the selected user to the user name. So, if you reset the password of John his password will be John. Change the administration privileges of the selected user. You can not change the administration privileges of the account you are logged on to.
This page allows you to change the default user. If users browse to the SpeedTouch web pages, they will be automatically logged in under this account.
To allow users to automatically log on under this account, this default user account must be configured with a blank password.
This page allows you to add a new user.
Under User definition you can configure: The name of the new user. The password of the new user will be equal to the user name; for example if the user name is John Doe, the password will be John Doe. Also when resetting a user, the password will be changed into the user name.
In the Networking Services window, Select Internet Gateway Device Discovery and Control Client and click OK.
You might consider a reset to factory defaults as described below.
Be aware that a reset to factory defaults will revoke all configurational changes you made to the SpeedTouch. Hardware reset Software reset
A reset to factory default settings deletes the configuration profile settings. Therefore, after the reset, a reconfiguration of your SpeedTouch will be needed.
Make sure the SpeedTouch is powered on. Use a pen or an unfolded paperclip to push the recessed reset button on the back panel. The reset button is marked with a red circle. Keep it pushed until the power LED lights red - this will take about 7 seconds.
Release the reset button. The SpeedTouch restarts.
Go to the SpeedTouch web pages. In the menu select SpeedTouch Configuration. In the Pick a task. list, click Reset my SpeedTouch to default settings. The SpeedTouch restarts. The SpeedTouch returns to the SpeedTouch Home page unless the IP address of your computer is not in the same subnet as the default IP address of the SpeedTouch, being 192.168.1.254.
THOMSON 2005. All rights reserved. E-DOC-CTC-20050429-0100 v1.0
Additional help is available online at www.speedtouch.com
In a minute you will be able to access the Internet using your SpeedTouch Residential ADSL Gateway. This Installation and Setup Guide will show you how to set up your SpeedTouch and how to connect a computer or a local area network LAN to the Internet.
The label on the bottom of your SpeedTouch informs you about the SpeedTouchs: Product name Model number Serial number Power requirements
Do not remove or cover the label.
The SpeedTouch comes in two ADSL variants: POTS: The SpeedTouch546 v6 connects to an analogue Plain Old Telephone Service POTS line. ISDN: The SpeedTouch546 v6 iconnects to an Integrated Service Digital Network ISDN line, enabling residences with an ISDN line to use the ADSL service.
You can easily identify your variant by checking the product name printed on the label on the bottom of your SpeedTouch.
Only use the SpeedTouch variant which is appropriate for the DSL service provided to your premises.
Your SpeedTouch comes with a Setup CD. If you insert the CD into a Microsoft Windows PC or Mac OS X computer: The first time, an intuitive SpeedTouch Quick-Install Wizard will guide you through the hardware setup of your SpeedTouch and will help you to connect to the Internet. See 2.2 Installing your SpeedTouch on page 7 for more information. For future reference, the SpeedTouch CD Menu provides links to all contents See 2.3 The SpeedTouch Setup CD on page 18 for more information.
SpeedTouch Home Install Wizard
The SpeedTouch Home Install Wizard has been designed to help you on the Internet very quickly. First, the wizard tries to detect your SpeedTouch. As soon as you have connected your SpeedTouch to your computer, the wizard configures your SpeedTouch and - if necessary - your computer. The Home Install Wizard was designed for Microsoft Windows operating systems and Mac OS X - in the latter case provided you use a wired connection to your SpeedTouch. You can start the SpeedTouch Home Install Wizard: Automatically from the SpeedTouch Quick Install Wizard when you insert the SpeedTouch Setup CD into a computer for the first time. See 2.2 Installing your SpeedTouch on page 7 for more information. From the SpeedTouch CD Menu Home page, via Run Quick Installation. This will in fact re-run the Quick-Install Wizard and subsequently start the Home Install Wizard as if you started the Setup CD for the first time. From the SpeedTouch CD Menu Maintenance page, via Reconfigure my SpeedTouch. If you do not want to use the guided installation procedure, you can also install and configure your SpeedTouch manually. See 2.2.2 Manual Installation on page 16 for more information.
Make sure you read the safety instructions and regulatory notices first. You can find the safety instructions on the Setup CD see 2.2 Installing your SpeedTouch on page 7. They may also be provided as a printed booklet.
The ADSL service must be up and running on your telephone line. If both conventional telephone and ADSL service are simultaneously available from the same copper pair, you will need a central splitter or distributed filters for decoupling ADSL and telephone signals. Public telephone lines carry voltages that can cause electric shock. Only try to set up splitter/filters that have been designed to be installed by unqualified personnel. For further assistance, contact your Internet Service Provider.
To connect computer s via Ethernet, make sure the computer s are equipped with an Ethernet network interface card NIC.
You need the following connection details from your Internet Service Provider ISP : Your ISPs method for connecting to the Internet for example PPPoE The VPI/VCI for example 8/35 Your user name and password to connect to the Internet You must have received this information when you subscribed to DSL at your Internet Service Provider ISP. You will be prompted for this information at a given step in the installation procedure.
You can mount the SpeedTouch on a wall, set it up upright or simply place it on a desk.
Proceed as follows to mount the SpeedTouch on a wall or other vertical surface:
Drill two holes in the wall or other vertical surface where you want to place the SpeedTouch. Fasten two screws in the wall holes. The screws should protrude five millimetres from the surface of the wall. Attach your SpeedTouch on the wall using the two mounting slots on the bottom.
DSLBSFFFFF RQQI DSLBSFFFFF RQQI
SSID:SoeedTouchVVVVVV WEP hex :1234ABCDEF WPA PSK: 1234ABCDEF TCM: 12345670
RATED INPUT: 18V THOMSON TELECOM 1000mA
If you install the SpeedTouch onto plasterboard, use dowels to secure the screws. Otherwise the strain of the cables connected to the SpeedTouch rear panel connectors could pull the SpeedTouch from the wall.
To set up the SpeedTouch in an upright position, use the cradle if available.
2.2 Installing your SpeedTouch
There are different ways to set up your SpeedTouch. The best way depends on your operating system.
If you use the following operating system
Microsoft Windows 98 SE, Millennium, 2000 or XP Mac OS X Any operating system provided you have IP connectivity
the recommended way to set up your SpeedTouch is
the Home Install Wizard, as described in 2.2.1 Guided Installation on page 8.
the Easy Setup, as described in 2.2.2 Manual Installation on page 16.
If you are using Microsoft Windows XP, you can also use the Microsoft Windows XP Internet Gateway Device IGD Control Agent for UPnP, as described in the SpeedTouch Users Guide.
On the CD, a Quick-Install Wizard is provided that will guide you through the first installation and setup of your SpeedTouch. The Quick-Install Wizard will: Provide important safety and regulatory information. Show you how to make the necessary connections to your SpeedTouch. Show you how to turn on your device. Prepare you to smoothly run the SpeedTouch Home Install Wizard. The subsequent SpeedTouch Home Install Wizard will then prepare your SpeedTouch and your local computer s to connect to the Internet. The Home Install Wizard will: Guide you through connecting your computer s to your SpeedTouch. Prepare the SpeedTouch to connect to the Internet.
Connecting the cables: wait. Starting the CD for the first time
You need administrative rights to run the applications on the Setup CD on a Microsoft Windows 2000 or XP operating system, or Mac OS X computer.
Do not plug in any cables until you are prompted to do so by the SpeedTouch Quick-Install Wizard and/or the SpeedTouch Home Install Wizard.
To start the SpeedTouch Setup CD Menu:
Insert the Setup CD into your computer s CD-ROM or DVD-ROM drive. Microsoft Windows: The CD should autostart. If not, see The SpeedTouch CD does not start automatically on page 31. Mac OS X: Double-click Menu in the window with the content of the CD.
Select the language of your choice and click OK. The procedure continues with the SpeedTouch Quick-Install Wizard. Proceed with Quick-Install Wizard on page 9.
The SpeedTouch Quick-Install Wizard guides you through the first setup of your SpeedTouch. Proceed as follows:
On the Welcome page, click Next to continue.
If you ran the CD on this computer before, the Quick-Install Wizard is not shown; the CD menu appears instead see 2.3 The SpeedTouch Setup CD on page 18 for more information.
Select your SpeedTouch from the list of supported devices and click Next.
A product picture helps you to easily identify your SpeedTouch. If you are not sure what device you have, check the label on the bottom of your SpeedTouch. The SpeedTouch Safety Instructions and Regulatory Notices are displayed.
Scroll down and read all the instructions carefully, select I have read and I fully understand the Safety Instructions and Regulatory Information to confirm your reading, and then click Next.
Your SpeedTouch is designed and tested to meet the latest safety standards. However, to ensure safe use of this product, it is important that you carefully read and comply with the Safety Instructions and Regulatory Notices shown and/or available in the Safety and Regulatory booklet before you install the SpeedTouch.
Subsequent screens guide you through the preliminary hardware setup of your SpeedTouch. Follow all the instructions carefully and click Next each time your are ready to proceed. As soon as all the required preliminary connections to your SpeedTouch have been made, and your SpeedTouch is turned on and initialized, the final steps in the Quick-Install Wizard will: Make all information readily available to let the Home Install Wizard configure your SpeedTouch to connect to the Internet. See Internet connection details on page 5 for an overview of information you must have readily available. Start the SpeedTouch Home Install Wizard.
Click Set up my SpeedTouch to continue. The procedure continues with the SpeedTouch Home Install Wizard. Proceed with Home Install Wizard on page 11.
The SpeedTouch Home Install Wizard guides you through your local network connections and prepares the SpeedTouch to connect to the Internet. Proceed as follows:
The Software License Agreement window appears.
You must accept before continuing. Click Yes to accept. If you accepted the Software License Agreement in a previous configuration setup, this window will not be shown. The SpeedTouch Home Install Wizard checks your system and invites you to connect the SpeedTouch to your computer.
See SpeedTouch wiring on page 19 for a comprehensive overview of all SpeedTouch connections.
Make the following connection: Connect the yellow RJ-45 Ethernet cable to the yellow Ethernet port on your SpeedTouch and the other end to the computers Ethernet port.
The procedure continues with the final steps of configuring your SpeedTouch and your computer. Proceed with Finishing the Home Install Wizard on page 15.
Finishing the Home Install Wizard
The SpeedTouch Home Install Wizard will configure the SpeedTouch and your computer according to the service profile. Proceed as follows:
You can follow the configuration progress in following window:
Click Finish to close the wizard. The following steps will happen automatically: After some seconds, the Internet LED on your SpeedTouch will be lit green to indicate Internet connectivity. If not, refer to 4.2 LED Diagnostics on page 27. If needed, you can test your Internet connection as described in Testing your Internet Connection on page 29. The SpeedTouch CD Menu is displayed. See 2.3 The SpeedTouch Setup CD on page 18 for more information. You are redirected to the embedded SpeedTouch pages automatically unless you cleared the check box in the last window of the Home Install Wizard. These pages allow you to configure the SpeedTouch firewall, SpeedTouch settings, and so on. See the SpeedTouch Users Guide for more information.
The computers networking interface used during the Home Install Wizard procedure will be configured for obtaining its IP configuration dynamically in the most cases. This is the most convenient configuration and should not be changed. For fixed or advanced IP configurations, please follow the instructions of your ISP.
With the help of the Easy Setup, your Internet connection is set up in a few clicks. The Easy Setup is Operating System independent.
Make sure that: Your SpeedTouch is correctly set up and turned on. Your computer is connected to the SpeedTouch. See SpeedTouch wiring on page 19 for a comprehensive overview of all SpeedTouch connections. Your host computer is configured as DHCP client or with a valid fixed IP address. For more information, refer to the Help of your browser. In case of problems, you can give the host computer a fixed IP address in the same subnet as your SpeedTouch If the SpeedTouch is in its default settings, that is an address between 192.168.1.1 and 192.168.1.253. In case you use fixed IP addresses, the SpeedTouch has to be configured as DNS server. Your Web browser is not using a proxy server. For more information, see Disable proxy server on page 34.
Open a Web browser. Browse to an arbitrary Web site, for instance http:// www.speedtouch.com. As long as no Internet connection has been set up, you will be automatically redirected to the SpeedTouch Welcome page.
If you are not redirected automatically, go to Starting the Easy Setup wizard on page 17.
Click Set up my SpeedTouch to start the Easy Setup wizard. Proceed with Using Easy Setup on page 17.
Starting the Easy Setup wizard
You can also start the Easy Setup wizard from within the embedded Web pages. Proceed as follows:
Browse to the SpeedTouch pages on or on its IP address, 192.168.1.254 by default. In the menu, click SpeedTouch.
In the Pick a task list, click Set Up.
Click Next to proceed. If for some reason you want to abort the wizard, click Cancel. Choose the Service provided by your ISP Router or Bridge and click Next. Select the appropriate VPI/VCI - and, if required, the Connection Type PPPoE or PPPoA - provided by your ISP, and then click Next. For a Routed service, fill in the Internet Account settings PPP user name and password provided by your ISP, and then click Next. Fill in the SpeedTouch Security user name and Password. The factory default user is Administrator and its password is blank. It is advisable to specify another Administrator user name and password to protect your SpeedTouch from security violation, as described in 2.6 Basic Security on page 21.
In the next window you can review your settings, before starting the configuration of your SpeedTouch. If something is missing or incorrect, click Back. To confirm your settings, click Start. Wait until the configuration is finished, and then click Finish.
Your SpeedTouch comes with a Setup CD. If you insert the Setup CD into a Microsoft Windows PC or Mac OS X computer, an intuitive CD Menu guides you through the features and contents of the Setup CD and allows you to easily browse for user documentation, SpeedTouch system software, service templates, etc.
The SpeedTouch CD menu appears automatically each time you insert the CD, or after running the Quick-Install Wizard and subsequent Home Install Wizard:
Select: Run Quick Installation to start the SpeedTouch Quick-Install Wizard and SpeedTouch Home Install Wizard. SpeedTouch Maintenance to: Reconfigure your SpeedTouch via the Home Install Wizard. Check for SpeedTouch software upgrades. Documentation and Help to: Consult user documentation for your SpeedTouch DSL Gateway. Consult user documentation for SpeedTouch networking products. See more information on SpeedTouch products and solutions. If you connect to the Internet, the document list will auto;atically be updated with the latest documentation. If you have problems viewing the SpeedTouch documentation, see I cannot view the SpeedTouch documentation on page 32. Visit the SpeedTouch DSL Site to visit the online support sections on www.speedtouch.com. View CD Contents to open a new window to view the Setup CD contents.
2.4 SpeedTouch Connection Essentials
The image below shows all possible types of connection to the SpeedTouch.
The colour coded printing on the backpanel of your SpeedTouch will facilitate matching the colour coded cables.
In most cases, the SpeedTouch Quick-Install Wizard and Home Install Wizard will guide you through the process of making all the required connections to your SpeedTouch. It is recommended to wait to make any of these connections until the wizard prompts you to do so. See 2.2 Installing your SpeedTouch on page 7 for more information. If you want to make the required connections yourself, see 2.5 Connections Overview and Powering on page 20 for more information.
2.5 Connections Overview and Powering
If you want to make the required connections yourself without using the guided installation procedure as recommended, you must: Read the safety instructions and regulatory notices first. You can find the safety instructions on the Setup CD see 2.2 Installing your SpeedTouch on page 7. They may also be provided as a printed booklet. Follow the order as indicated below.
Use the grey DSL cable to connect the SpeedTouch DSL port to your telephone wall outlet or distributed filter.
Plug the coaxial jack of the electric power supply adapter into the SpeedTouch power inlet port and the other end into the wall outlet. The SpeedTouch electrical power requirements are indicated on the label on the bottom side of your SpeedTouch. In case you need to use another power supply than the one provided, make sure that the spare supply complies with the SpeedTouch power requirements.
To turn on the SpeedTouch, press the power button on the SpeedTouch rear panel. During the start-up procedure, the power LED on the front panel is lit red for some seconds. As soon as the power LED is solidly lit green, your SpeedTouch is ready for service. After another couple of seconds, also the DSL LED will light green. If these LEDs do not light, please refer to Checking the LEDs on page 27. A comprehensive LED overview can be found in the SpeedTouch Users Guide. Use the same button to turn off your SpeedTouch.
Your SpeedTouch allows you to connect your computer s via Ethernet It is recommended to use the Guided Installation procedure. See 2.2.1 Guided Installation on page 8 for more information.
Default user name and password Changing your password
DSL Connection Internet Services
Remote Assistance Game Application Sharing Parental Control Firewall Intrusion Detection Dynamic DNS User Management
The first things to check if you cannot access the Internet, are: Power Hardware connections LEDs
In case your SpeedTouch is unreachable due to misconfiguration, you might consider a hardware reset to factory defaults as described in 4.6 Reset to Factory Defaults on page 35.
However, note that resetting the SpeedTouch to its factory settings will revoke all the changes you made to the configuration.
If the suggestions in this chapter do not resolve the Internet connection problem, please contact your Internet Service Provider.
Plug in properly all the cables you need. Make sure that the cables between your SpeedTouch, computers and telephone socket are plugged in firmly. Loose connections can affect your Internet connection. Damaged cables can interfere with your Internet connection. Check for damage along the cables and loose connections at the end of the cable. Replace any damaged cables.
To eliminate the possibility of a fault with the telephone line itself, check for a dialling tone by using a telephone connected to the telephone master socket. If you are using ADSL, check whether a splitter has been installed or that microfilters have been correctly fitted. Contact your telephone company if there is no dialling tone.
Loss of Internet or network connectivity may be caused by the computer. Restarting your computer may solve the problem.
To restart your SpeedTouch, simply turn it off. Wait five seconds and turn it back on.
After establishing a connection with the Internet, at least the following LEDs should solidly light green: Power, DSL, Internet.
The SpeedTouch is not turned on, or turned off. Make sure the SpeedTouch is plugged into an electrical outlet. Make sure you are using the correct power supply for your SpeedTouch. The SpeedTouch electrical power requirements are indicated on the label on the bottom of your SpeedTouch. Make sure the SpeedTouch is turned on. Unplug the SpeedTouch, restart your computer and then plug the SpeedTouch back in.
Power LED is lit red or flashing amber
The SpeedTouch is malfunctioning or not able to start up. Fully unplug the SpeedTouch from your computer and disconnect it from its power supply. Wait five seconds, connect the SpeedTouch again and turn it back on. Your DSL service is unable to synchronise. Make sure the SpeedTouch is plugged into the DSLenabled phone line. Make sure micro-filters are correctly fitted if not, it is very likely that your regular telephone service is not working properly. Make sure you have the correct SpeedTouch variant ISDN or POTS according the DSL/phone service provided to your premises. If you have previously had a working connection, call your ISP to check for service outages.
DSL LED is flashing green or no DSL LED
No Ethernet connectivity: Make sure the Ethernet cable s are firmly connected to the 10/100Base-T port. Make sure you are using the correct cable type for your Ethernet equipment. Make sure the Ethernet NIC driver is correctly installed and enabled on your computer. Power safe options for the Ethernet NIC should preferably be disabled.
Red Internet LED or No Internet LED
There was an authentication failure. This will usually present itself as an error message regarding an incorrect password. Check whether your user name is correct. For ADSL connections, the user name is normally in the form of username ISP. Check whether your password is correctly entered. The password is case sensitive. If you continue to get password failures, contact your ISP. The wrong service profile was selected. Restart the setup of your SpeedTouch, and make sure to select the correct service profile.
You can find a comprehensive LED overview in the SpeedTouch Users Guide.
Testing your Internet Connection
After setting up the Internet connection, there is an easy way to check whether your configuration is fine. Proceed as follows:
Go to the SpeedTouch home page or 192.168.1.254. In the Menu, click SpeedTouch. In the Pick a task list, click Check connectivity to the Internet. In the Internet Service to Check box, select the Internet service you want to check. Click Check Connectivity. If the test is successful, you will see a list of green check marks as shown in the example below:
Otherwise a red cross will help you to diagnose the problem:
Your DSL line is not synchronised. Check whether your telephone line is correctly connected to your SpeedTouch. Check the DSL LED, as described in Checking the LEDs on page 27.
No ATM activity detected on your DSL line.
No Ethernet activity. If you are connected through a protocol other than PPPoE, this check is not applicable as the result will always be No Ethernet activity. Authentication failed: check your user name and password. The user name is in most cases in the form of username ISP. Your connection is disconnected. Could not bring up link.
No IP address or no DNS server has been configured. During IP address negotiation, there was an IPCP error or a DHCP error. This test sends 1 ping to each address of a configured list of IP addresses. The test succeeds if all addresses can be reached. If your primary and secondary DNS server are part of the list, reaching one of both is enough. The DNS service provided by your ISP may have a problem.
4.4 SpeedTouch Setup CD Troubleshooting
The SpeedTouch CD does not start automatically
Proceed as follows: In Microsoft Windows:
In the Windows task bar, click the Start button. Select Run. In the Open field, enter the following path: D: Setup.exe, where D stands for the drive letter of your CD-ROM drive. On your desktop, double-click the CD icon. Double-click Menu.
The wizard does not detect a connection
If the Home Install Wizard does not detect a connection to your SpeedTouch, an error window appears.
If this is the case, check whether: The SpeedTouch is turned on and fully initialised. Your computer has a valid IP address, that is any address but 0.0.0.0. In Microsoft Windows:
In the taskbar, click the Start button. Select Run. In the Open field, type cmd. Click OK. A black window will appear with a flashing cursor. Type ipconfig /all and press ENTER. In Microsoft Windows 98 or Microsoft Windows Millennium, type winipcfg and then press ENTER. Your IP address is displayed.
Go to Dock System Preferences. Click Network. Click the TCP/IP tab. Your IP address is displayed.
No dedicated firewall device or router is placed between your computer and the SpeedTouch. No personal network security software for example firewall software is running on your computer. Your computer is correctly connected to the SpeedTouch. To repeat the search for your SpeedTouch, click Back or restart the wizard. As soon as the wizard finds your SpeedTouch, you can continue with Configuring the SpeedTouch and your computer on page 14.
The SpeedTouch is not responding
If the completion window does not appear after running the SpeedTouch Home Install Wizard, this means that the SpeedTouch is not responding or not accessible anymore. There are two possibilities: This might be due to the reconfiguration of the SpeedTouchs IP settings. In this case, the last window of the Home Install Wizard will not be shown. Your SpeedTouch is correctly set up though and you will be able to surf the Internet. If you did not reconfigure the SpeedTouchs IP settings, restart the Home Install Wizard. If the setup fails over a wireless connection, try to set up your SpeedTouch using a wired connection. If the problem persists, refer to the Service Providers instructions for more information.
I cannot view the SpeedTouch documentation
To be able to view the SpeedTouch documentation pages on the Setup CD, JavaScript must be enabled in your Web browser. For more information, refer to the Help of your Web browser. To allow active content on a Microsoft Windows XP system, see I get a warning about active content in Internet Explorer on page 33.
I get a warning about active content in Internet Explorer
When opening documentation pages from the Setup CD, a warning might be displayed. This may be the case when the pages are opened in Internet Explorer and you are using Microsoft Windows XP with Service Pack 2. Proceed as follows to view the documentation:
In Internet Explorer, the following message will appear in the Information Bar: Click the Information Bar with the warning. Select Allow Blocked Content. A security warning is displayed:
Click Yes. You can now view or print the SpeedTouch documentation pages. This warning will be displayed every time you consult the documentation. If you do not want this message to be shown in the future, you must allow CDs to run active content on your computer:
In the Internet Explorer menu, select Tools Internet Options. Click the Advanced tab. Under Security, select Allow active content from CDs to run on My Computer.
4.5 Easy Setup Troubleshooting
Before you run the Easy Setup on the embedded SpeedTouch pages, make sure that: The necessary connections are made. The SpeedTouch is turned on. Your host computer is configured as DHCP client or with a valid fixed IP address. If you have any problems, you can give the host computer a fixed IP address in the same subnet as your SpeedTouch If the SpeedTouch is in its default settings, that is an address between 192.168.1.1 and 192.168.1.253. If you use fixed IP addresses, the SpeedTouch has to be configured as DNS server default.
Your Web browser must be able to run JavaScript. The following browsers are supported: Internet Explorer 5.0 and later Netscape Navigator 4.7 and later Mozilla Firefox 1.2 and later Opera 5 and later Konqueror 2.2 and later
The Easy Setup only works if the proxy server is disabled or bypassed for local addresses. For more information, refer to the Help of your Web browser. Proceed as follows to disable a proxy server in Internet Explorer:
In the Internet Explorer menu, choose Tools Internet Options. Click the Connections tab. Click the LAN settings. button. Clear the Use proxy server box and the Use automatic script box. It is recommended to disable all other network connections on your computer first, except the one connecting to your SpeedTouch. Proceed as follows to disable a network connection:
In the Windows XP taskbar, click the Start button. Choose All Programs Control Panel Network and Internet Connections Network Connections. Right-click the network interface icon you want to disable and choose Disable.
Be aware that a reset to factory defaults will revoke all configurational changes you made to the SpeedTouch.
Reset to default configuration
Make sure the SpeedTouch is turned on. Use a pen or an unfolded paperclip to push the recessed reset button on the back panel. The reset button is marked with a red circle. Push it until the power LED lights red - this will take about 7 seconds.
THOMSON 2006. All rights reserved. E-DOC-CTC-20051017-0068 v2.0
manuel d instructions, Guide de l utilisateur
Manual de instrucciones, Instrucciones de uso
Bedienungsanleitung, Bedienungsanleitung
Manual de Instruções, guia do usuário
návod na použitie, Užívateľská príručka, návod k použití
instrukcja, podręcznik użytkownika
kézikönyv, használati útmutató
manuale di istruzioni, istruzioni d uso
handleiding, gebruikershandleiding.

- Speedtouch 546 I Manual We have a lot more Thomson SpeedTouch-546v5 guides listed below. Login to Thomson SpeedTouch-546v5 Router Download Manuals for.
- SPEEDTOUCH 546 v6 ROUTER MODEM 546 Here you can find all about Thomson You searched for: Driver modem adsl thomson speedtouch 536 v6 the Ethernet or.
- Speedtouch 546 Manual You are bidding on a NEW THOMSON SPEEDTOUCH 546 v6 ROUTER MODEM 546 Here you can find all about Thomson Speedtouch 546 like.
About Thomson Speedtouch 546 Here you can find all about Thomson Speedtouch 546 like manual and other informations. For example: v6 setup, password, adsl router.

